
You can buy this pattern as a printable pdf file on Ravelry.
In February I visited my cousins in Copenhagen, Denmark. I didn’t plan on starting a new project while visiting. I actually started a new project on the plane that I fully intended to work on during my stay.
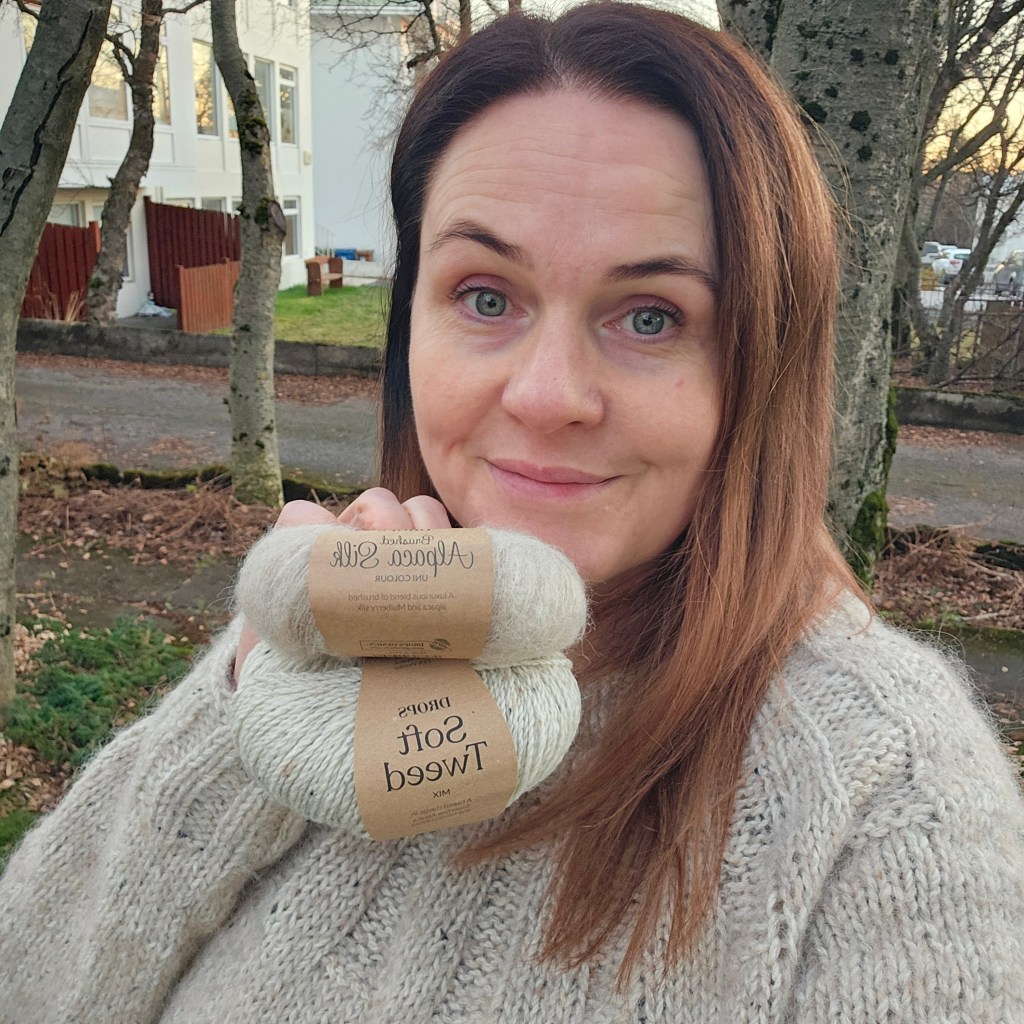
But then we visited this cute yarn store & café called Woolstock and I found a yarn that I had been curious about for a long time, Esther by Permin, and I just had to buy some and try it out.
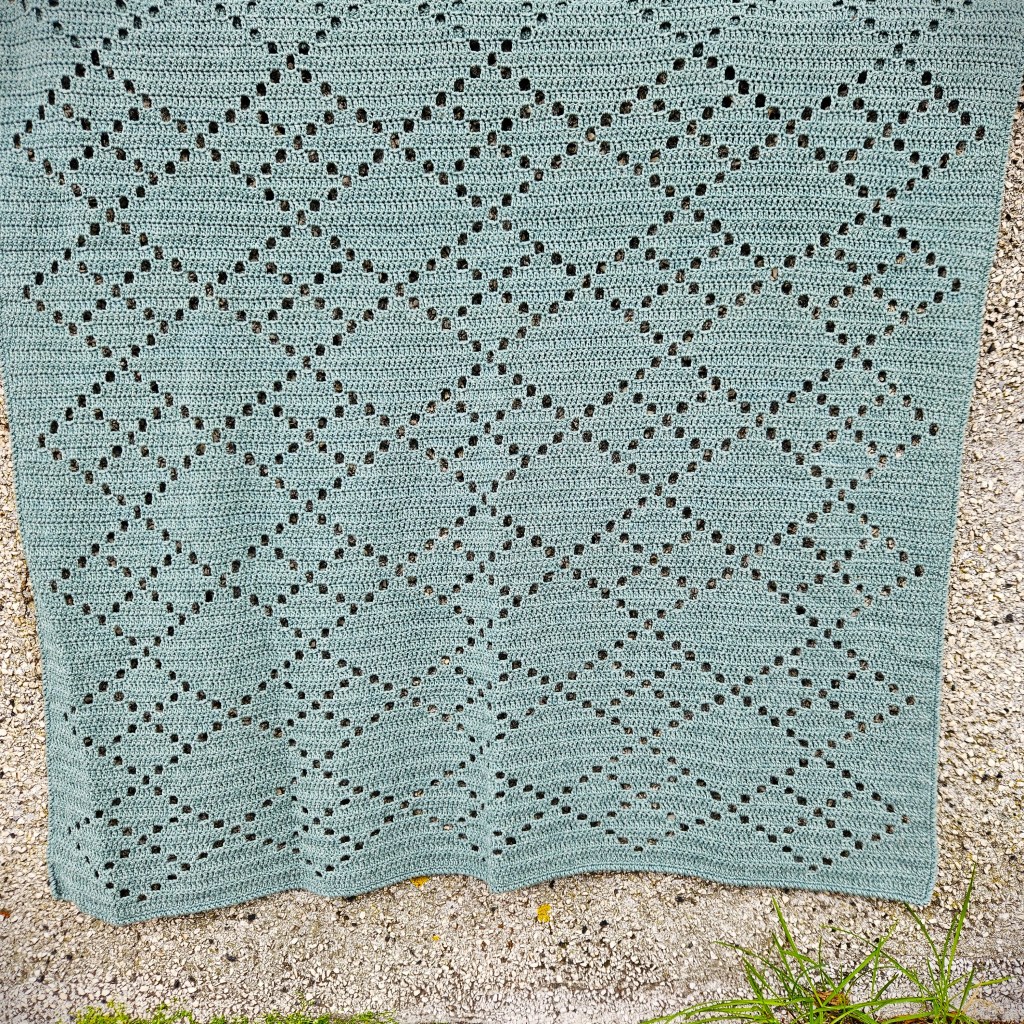
I had seen a beautiful pattern on a brick wall while on the bus that I couldn’t get it out of my head. A pattern that would be perfect for a filet pattern. So I bought 7 skeins and decided to go for it! My cousin I was visiting chose the color and I decided to name the pattern Elías after her son.

Materials:
Yarn: I used 7 skeins of Esther by Permin (50g/230m), color no. 6, flaskegrøn (danish for bottle green). Esther is a fingering weight yarn, or baby, so you can use any other yarn on that weight, just be sure you have enough length of yarn for your project.
Crochet hook: 2,5 mm, or the size needed to get the gauge.
Gauge: 22 extended double crochet x 12 rows = 10×10 cm or 4×4 inches, before washing.
Size: ca 84 cm wide and 110 cm long before washing.
Filet crochet:
The Elías blanket is crocheted using a method called filet crochet. I really enjoy crocheting using grid patterns because it offers so many possibilities. Pattern designs in filet crochet are simple and easy to read, and it’s even possible to crochet filet crochet using cross-stitch patterns.
The foundation of filet crochet is a net crocheted with chain stitches and double crochet stitches. This net looks like a grid-marked sheet. To create patterns, these grids are either left empty or filled. Each grid consists of 3 stitches, except for the first grid of each row, which consists of 4 stitches.
Filet crochet is mostly used to crochet curtains, table runners or other types of home décor. And it’s common for most grids to be empty while the filled grids form the pattern. However, since this is a blanket, most grids are filled, and the empty grids form the pattern.
Text, symbols & table:
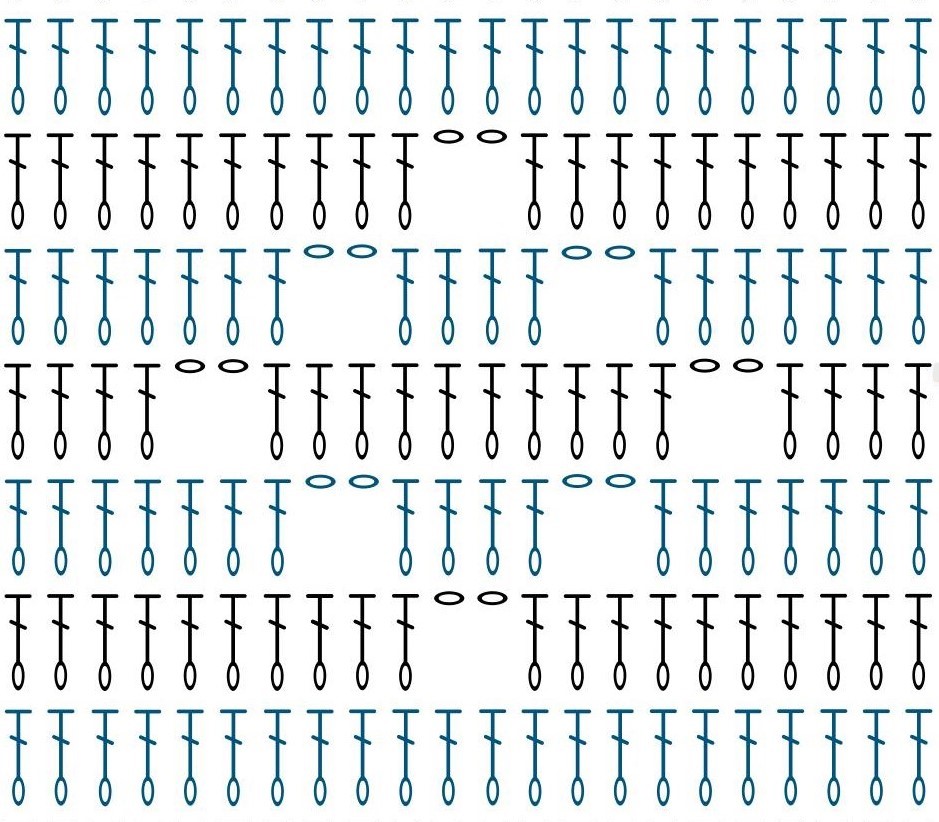
I’ve presented the pattern in three ways: through text, symbols, and a table. Text and symbols are common in crochet patterns. However, I find it most convenient to read grid patterns, like the Elías blanket, from a table. When I designed the pattern and was crocheting according to it, I drew it on grid paper and then wrote on the paper how many double crochet stitches I should make between the empty grids. That’s why I decided to include this table.
The text is the foundation of the pattern, and all the information is presented in the text. If you’re reading the pattern from the symbols or the table and are unsure about the number of stitches or repetitions, check to see what is stated in the text.


Why extended double crochet?
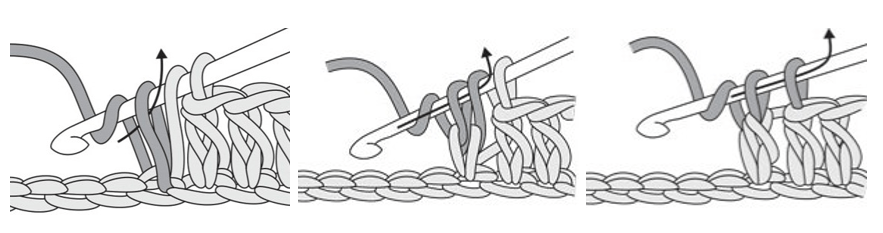
Filet crochet is usually made with dc’s (double crochets stitches) or tr’s (treble crochet stitches). I wasn’t happy enough with the outcome using those stitches. I thought the pattern was too closed with dc’s – and too open and loose with the tr’s. When I tried the edc’s (extended double crochet stitches) I knew I had found the best stitch for me.
It didn’t take long for me to get used to making edc’s instead of dc’s. But if you really don’t like the idea of making edc’s you can make dc’s or tr’s. Just know that if you don’t use edc’s, the size of your blanket will change and the amount of yarn you need.

Detailed explanations of stitches:
Extended double crochet – edc :
Yarn over hook, insert hook in next stitch, yarn over and pull up a loop, 3 loops on hook, yarn over and pull through 1 loop (photo 1), still 3 loops on hook, after this the double crochet is finished like usually, yarn over and pull through 2 loops (photo 2), 2 loops on hook, yarn over and pull through last 2 loops (photo 3).
Twisted single crochet:
Twisted sc’s are brilliant. They are almost the same as regular sc’s, apart from this one thing – a twist.
Insert the hook in the stitch to be worked, yarn over, draw back through stitch, now you have 2 loops on your hook, it’s best to have them a little loose, turn your hook in a full 360° circle, doesn’t matter which way, now the 2 loops on the hook have a twist, yarn over, draw back through both loops. And you have made a twisted sc.
If you find that it is to difficult to draw back through the loops after you twist them they are to tight, loosen them up a bit before you twist them and the drawn back should go smoother.


The pattern in text:
Abbreviations US:
st – stitch, ch – chain, sl st – slip stitch, sc – single crochet, edc – extended double crochet, gap – chain 2, skip 2 stitches (empty grid)
Each row begins with ch 2, which are not counted in the stitch count and are not crocheted into. The 1st extended dc of the row is then made in the 1st. stitch. I do this to avoid the small gap at the beginning of each row, that occurs when crocheting 3 chains and skipping the 1st stitch, as is common in crochet.
Gap: Ch 2 + skip 2 st (empty grid)
Chain 192. (or a multiple of 36 + 12 stitches).
Row 1: Make 1 edc (explained above in post) in the 3rd ch from hook (do not count the skipped 2 ch), 1 edc in each st of row. (190 edc)
Row 2: Ch 2 (do not count), 22 edc, gap, *34 edc, gap*, repeat from * to * 3 more times, 22 edc.
Row 3: Ch 2, 19 edc, gap, 4 edc (2 of these edc go in the gap from the previous row), gap, *28 edc, gap, 4 edc, gap*, repeat from * to * 3 more times, 19 edc.
Row 4: Ch 2, 16 edc, gap, 10 edc, gap, *22 edc, gap, 10 edc, gap*, repeat from * to * 3 more times, 16 edc.
Row 5: Ch 2, 13 edc, gap, *16 edc, gap*, repeat from * to * 8 more times, 13 edc.
Row 6: Ch 2, *10 edc, gap, 4 edc, gap*, repeat from * to * 9 more times, 10 edc.
Row 7: Ch 2, 7 edc, gap, 10 edc, gap, *4 edc, gap, 10 edc, gap*, repeat from * to * 8 more times, 7 edc.
Row 8: Ch 2, 4 edc, gap, *16 edc, gap*, repeat from * to * 9 more times, 4 edc.
Row 9: Ch 2, 7 edc, gap, 10 edc, gap, *4 edc, gap, 10 edc, gap*, repeat from * to * 8 more times, 7 edc.
Row 10: Ch 2, *10 edc, gap, 4 edc, gap*, repeat from * to * 9 more times, 10 edc.
Row 11: Ch 2, 13 edc, gap, *16 edc, gap*, repeat from * to * 8 more times, 13 edc.
Row 12: Ch 2, 16 edc, gap, 10 edc, gap, *22 edc, gap, 10 edc, gap*, repeat from * to * 3 more times, 16 edc.
Row 13: Ch 2, 19 edc, gap, 4 edc, gap, *28 edc, gap, 4 edc, gap*, repeat from * to * 3 more times, 19 edc.
Row 14: Ch 2, 22 edc, gap, *34 edc, gap*, repeat from * to * 3 more times, 22 edc.
Row 15: Ch 2, 1 edc in each st of row. (190 edc)
Repeat rows 3-14 nine more times, then do row 15. Do not fasten off, proceed directly to crochet the border.
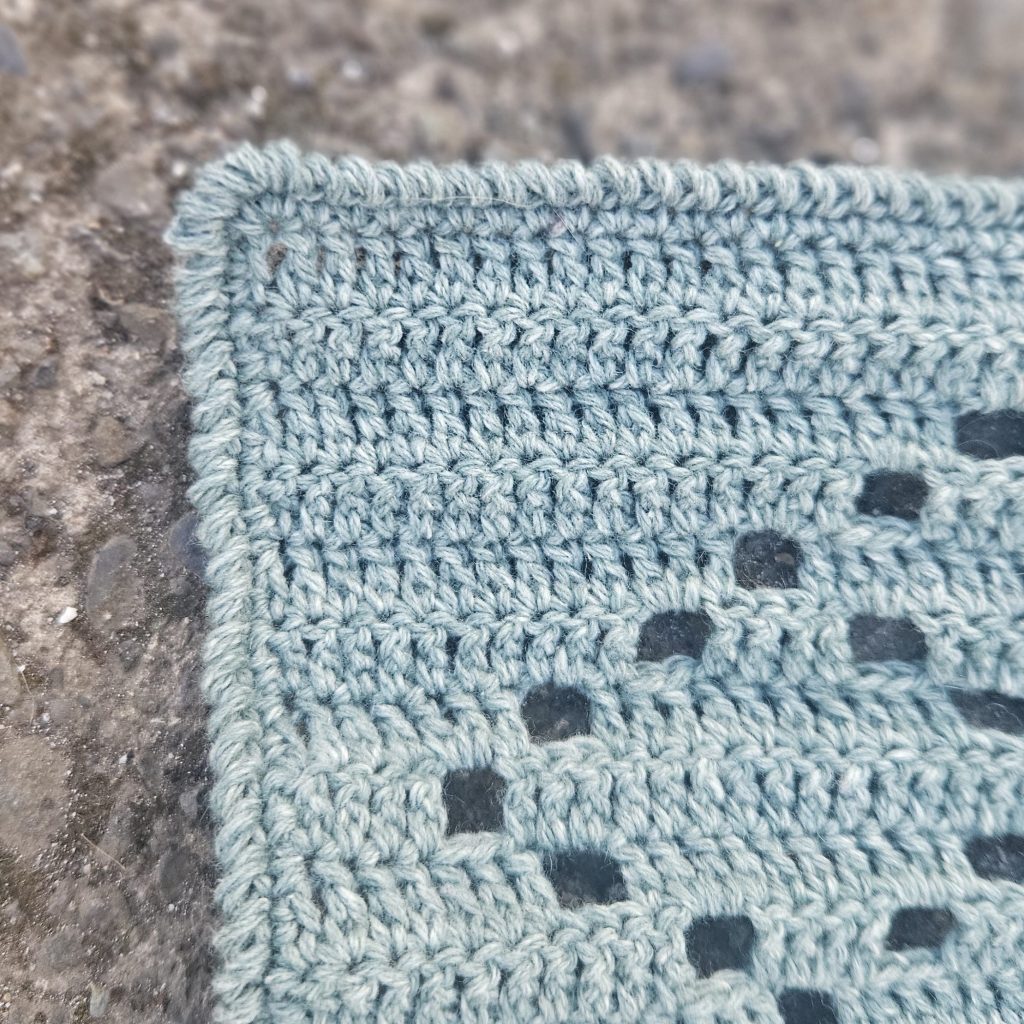
Border:
When it comes to the border the exact number of chains doesn’t matter, instead, focus on how the border fits the blanket. When crocheting the first round of the border, observe whether the border starts to ruffle or if the border is pulling the blanket together.
If the border starts to ruffle, it indicaes too many sc, decrease sc evenly until the ruffle stops. Example: 2 sc in 3 edc, 1 sc in 1 edc. If the border is pulling the blanket together, it indicates too few sc, add sc evenly until the border stops pulling the blanket. Example: 2 sc in 3 edc, 3 sc in 1 edc.
Rnd 1: Do not turn. Ch 1 (does not count as a stitch), work 2 sc into the side of each edc down along the side of the blanket, 3 sc in the corner (first st on the bottom), 1 sc in each st along the bottom of the blanket, 3 sc in the corner (last st on the bottom), work 2 sc into the side of each edc up along the side of the blanket, 3 sc in the corner (first st on the top), 1 sc in each st along the top of the blanket, 3 sc in the last corner (last st on the top), close round with a sl st in the 1st sc.
Rnd 2: Ch 1 (does not count as a stitch), make a twisted sc in each st of rnd (see explanation at the end of the pattern), make 2 twisted sc in the corners (middle sc of those three sc in the corner), cut the yarn, pull the loop on the hook completely up so that the yarn loosens, weave in the end.
Pattern in symbols:
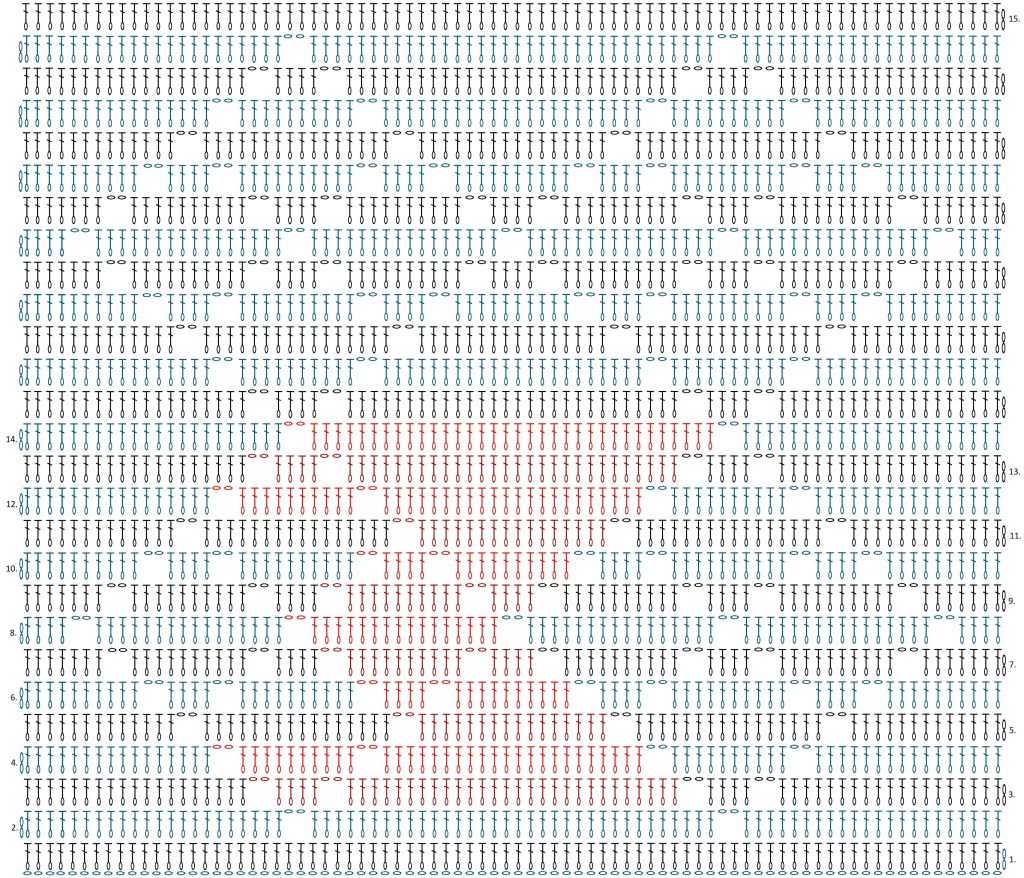
Chain 192. Or a multiple of 36 + 12 stitches.
The red symbols in the chart mark the repetition stitches.
Repeat rows 3-14 nine more times, then make row 15 once to finish the blanket.

Pattern in a table:
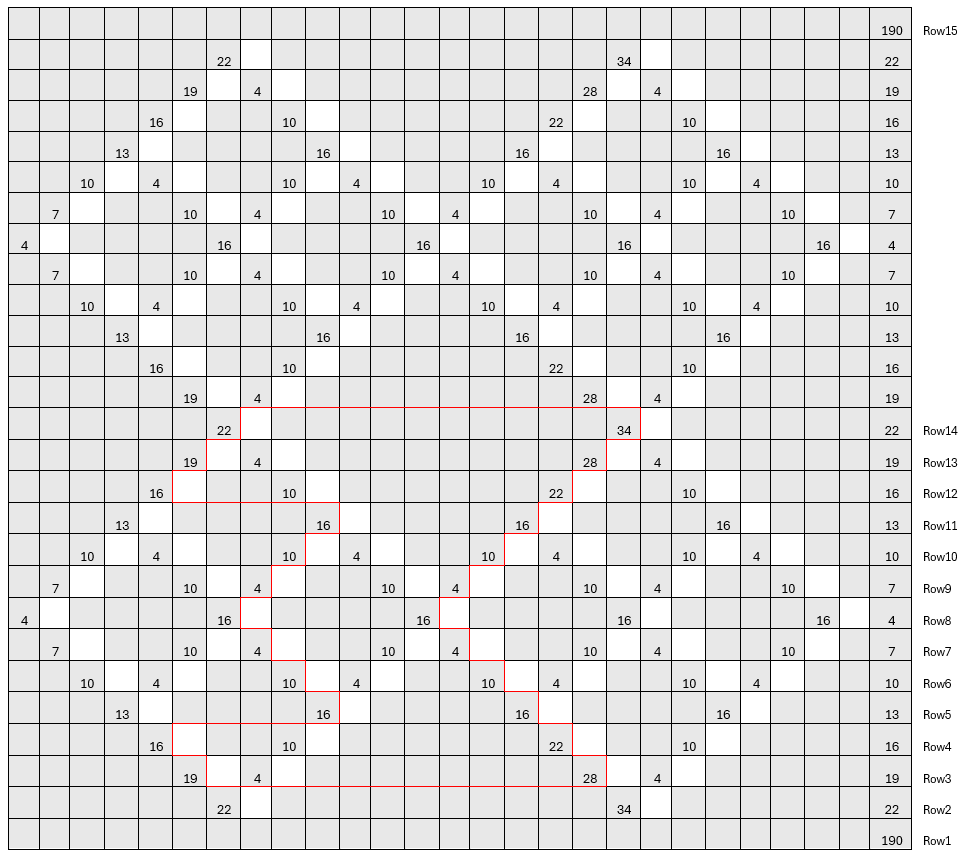
Use the table with the text part of the pattern.
Empty grid: ch 2 + skip 2 st
The red frame in the table marks the repetition stitches.
Repeat rows 3-14 nine more times, then make row 15 once to finish the blanket.
Before you go!
For pattern support please email me at fidgetyhandscrochet@gmail.com
Hope you enjoyed making your Elías blanket as much as I did! If you post a photo on Instagram please tag me @fidgetyhands and/or use the hashtag #EliasCrochetBlanket & #FidgetyHandsCrochet – I love seeing what you make 😊
© FidgetyHandsCrochet 2025, Elín Guðrúnardóttir
Please respect my work and do not copy or redistribute this pattern.


Leave a comment